Step 01 · General clutch practice· Done
Get to the primary clutch
Let everything cool, then take the CVT cover off as your machine’s service manual describes.
Some Packard kits ship with four cam arms (clutch weights) for a six-position primary clutch. They go in as two opposite pairs, and the last pair stays empty. Here’s the layout, why it has to be that way, and how to swap arms without throwing the clutch out of balance.
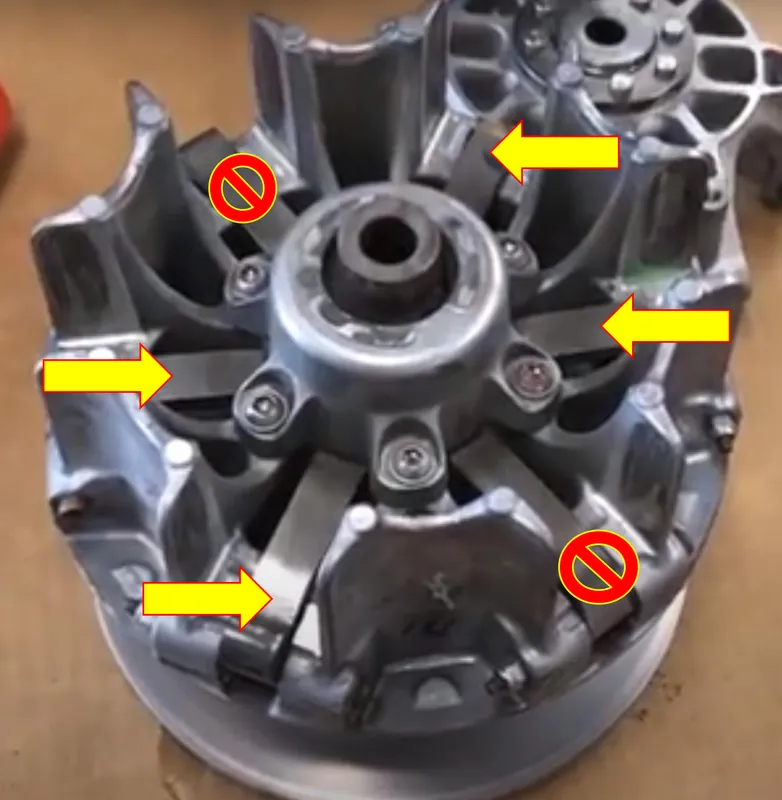
The layout
Arms go where the yellow arrows point. The two positions with the red no symbol stay empty.
Tap a position to see its partner across the clutch.
Why pairs
The primary clutch turns as fast as the engine does. Weight on one side with nothing across from it is an imbalance at every one of those revolutions. Pairs keep it balanced: an arm across from an arm, an empty slot across from an empty slot.
The arms are the clutch’s flyweights: as the clutch spins, they swing out and squeeze the belt. Less total arm weight means the engine has to rev higher before the clutch shifts, and that’s how a CVT is set to hold the rpm a bigger turbo wants.
The swap
Check them off as you go; this page remembers where you are on this device.
Let everything cool, then take the CVT cover off as your machine’s service manual describes.
Before you touch anything, take a photo of the clutch and note what sits in each position. It’s your map back if anything gets mixed up.
Each arm rides on a pin held by a nut, with washers on both sides. Work one position at a time and keep each arm’s washers in the order they came out; a magnet helps fish out the arm and the small parts.
Put the arms where the yellow arrows point in the layout: positions 1, 2, 4 and 5. That’s two pairs, each arm directly across from its twin.
Positions 3 and 6, marked with the red no symbol, stay empty: no arm, no weight.
Tighten each pin’s nut until the pin is snug, then check the arm by hand. It has to swing freely on its pin. An arm that binds won’t move when the clutch spins.
Go around the clutch once more. Every arm has another arm directly across from it, and every empty position has an empty position across from it. If anything doesn’t pair up, fix it before the cover goes on.
Reinstall the CVT cover and test drive. Watch the rpm against your tune’s target; on the Packard Can-Am big turbo that’s 8,500 with stock cams and 9,200 with Packard cams.
Watch
From the Packard tech channel.
Questions
Less arm weight lets the engine rev higher before the clutch shifts. Four arms, set as two opposite pairs, keep the clutch balanced while taking weight out.
The ones the yellow arrows point to in the layout: 1, 2, 4 and 5 in our diagram. Positions 3 and 6, marked with the red no symbol, stay empty.
No. They go in two pairs, each arm directly across from another arm. Any other layout puts the clutch out of balance.
Snug. The arm has to swing freely on its pin, so check each one by hand after you tighten it.
Tell us your machine and your build, and we’ll tell you what goes where. The shop answers by email.